The first time I tasted Baked Alaska was at a restaurant in Hong Kong, and I was hooked instantly. Even though I’ve loved it for a long time, I hadn’t actually tried making it myself until recently. With Valentine’s Day around the corner, I thought it would be a fun surprise for my husband and the boys. They were so impressed—and they finished every last bite!
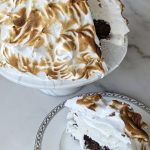
Baked Alaska is such a classic—it’s basically a cloud of toasted meringue with layers of cake and ice cream hidden inside. It’s that mix of hot and cold that always makes it exciting when you bring it to the table.
The secret? It’s far easier to make than it looks.
For this one, I used a rich chocolate cake base and homemade vanilla ice cream. I also used my Thermomix to get a foolproof meringue, which made the whole thing feel a lot less intimidating.
You do have to move fast so the ice cream doesn’t melt while you’re putting it together, but it’s worth the hustle. It’s a great way to make something special for the family without a complicated list of steps.


The History of Baked Alaska
The story behind Baked Alaska is just as interesting as the dessert itself. While using whipped egg whites as insulation has been around since the early 1800s, the version we know today was actually named at Delmonico’s in New York back in 1867.
It was created to mark the U.S. purchase of Alaska from Russia. The icy centre was meant to represent the frozen land, while the toasted meringue was the “baking” part. It quickly became the go-to grand finale for fancy dinners because those snowy peaks really let a chef show off.
Over time, people have made it their own with all kinds of cake bases and flavours. Some even do a flambé finish, where they light the meringue on fire for a bit of drama at the table. My first time trying it in Hong Kong was actually that flaming version—it was so cool to watch!
The Components of Baked Alaska
Cake Base: Consider using a sponge cake or genoise for a light and airy texture that complements the richness of the ice cream and meringue. When selecting or baking the cake, ensure it is sturdy enough to support the weight of the ice cream and meringue without becoming soggy.
Ice Cream Layer: Choose ice cream flavours that complement each other and the cake, such as pairing chocolate cake with vanilla ice cream or lemon cake with raspberry sorbet. Consider the texture of the ice cream; firmer ice creams will hold their shape better when frozen and sliced. To shape the ice cream layer, line a bowl with plastic wrap, fill it with softened ice cream, and freeze until firm before unmolding onto the cake.


Meringue Topping: Making meringue involves beating egg whites and sugar until stiff peaks form, creating a light and fluffy topping for the dessert. To achieve the perfect meringue texture make sure you are using clean, dry equipment and adding sugar gradually to stabilize the egg whites. Experiment with flavour variations by adding extracts such as vanilla or almond, or incorporating ingredients like cocoa powder or espresso for a twist.
The meringue is more than just a pretty topping; it’s a thermal shield. The air trapped in the whipped egg whites acts as a powerful insulator, slowing down the heat transfer so the ice cream stays frozen while the outside gets that perfect, toasted finish.
Assembling and Baking Baked Alaska
To put the Baked Alaska together, start by placing your cake base on a baking sheet and adding the ice cream layer on top once it’s nice and firm from the freezer. Then, pipe or spread the meringue over the whole thing, making sure it’s completely sealed so the ice cream stays protected.
Next, you’ll want to brown the meringue. You can do this quickly in a hot oven, but you have to be fast so the ice cream doesn’t start to melt. Personally, I prefer using a kitchen torch. I just rotate it around to get an even, golden brown; it gives me much more control and a really nice finish. When you’re ready to serve, just slice through all the layers with a sharp knife to show off that mix of cake, ice cream, and toasted meringue inside.
Modern Twists on Baked Alaska
To create unique variations of Baked Alaska, try different cake flavours like chocolate, lemon, or almond. For vegan or dairy-free options, use non-dairy ice creams or sorbets. Get creative with toppings such as melted chocolate drizzles or fresh fruit compote to add extra flavour and visual appeal to the dessert.
Tips and Techniques
- Ensure all components are fully prepared before assembling the Baked Alaska. This includes baking and cooling the cake, shaping and freezing the ice cream, and making the meringue.
- Opt for a sturdy cake base that can support the weight of the ice cream and meringue without becoming soggy. Sponge cake or genoise are traditional choices.
- When shaping the ice cream layer, use a bowl lined with plastic wrap to create a dome shape. Freeze the ice cream until firm before unmolding onto the cake.
- Add fresh cream of tartar to help stabilize the meringue.
- Apply the meringue generously, ensuring it completely covers the ice cream and cake. The meringue acts as insulation, protecting the ice cream from the heat of the oven.
- Use a kitchen torch for precise control over browning, or briefly place the dessert in the oven. Keep a close eye on the dessert to prevent over-browning or melting of the ice cream.
- Baked Alaska is best served immediately after browning the meringue to ensure the ice cream remains frozen.
Troubleshooting
- Soggy Cake: To prevent the cake from becoming soggy, ensure it is fully cooled before assembling the dessert. You can also lightly brush the cake with a simple syrup or liqueur for added flavour and moisture.
- Melting Ice Cream: If the ice cream starts to melt during assembly or browning, work quickly and return the dessert to the freezer if needed. Chilling the cake base before adding the ice cream can also help maintain its shape.
- Overbrowned Meringue: If the meringue browns too quickly or unevenly, shield the edges with aluminum foil while continuing to brown the center. Alternatively, use a kitchen torch for more precise control over browning.
- Meringue Deflation: To prevent the meringue from deflating after browning, add fresh cream of tartar, ensure the egg whites are whipped to stiff peaks and the sugar is fully dissolved. Avoid overmixing the meringue once the sugar is added.
- Serving Difficulty: If slicing through the meringue proves challenging, use a sharp knife dipped in hot water for clean cuts. Wipe the knife clean between slices to prevent sticking.
When it comes to desserts, few treats make an impression like Baked Alaska. It’s a delicious mix of flavours and textures that’s quite hard to resist. Once you’ve had a bite, you’ll be hooked and craving it again. Try it yourself, it’ll definitely impress your friends and family!
Baked Alaska
Ingredients
- 1 6-inch sponge cake or genoise (homemade or store-bought)
- ice cream, your choice of flavour(s)
- 4 large egg whites (room temperature)
- 1 cup granulated sugar (200g)
- 1/4 tsp cream of tartar (helps to stabilize the meringue)
- 1 tsp vanilla extract
- pinch of salt
Instructions
- If using store-bought cake, skip to step 2. If making homemade cake, bake and cool your preferred sponge cake or genoise recipe in a round cake pan. Once cooled, remove from the pan and trim to fit the size of your ice cream layer. Place the cake on a baking sheet lined with parchment paper.
- Line a round bowl with plastic wrap, leaving enough overhang to cover the ice cream later. Soften the ice cream slightly and spread it evenly into the bowl, creating a dome shape. Cover with the overhanging plastic wrap and freeze until firm, at least 4 hours or overnight.
- In a clean, dry mixing bowl, beat the egg whites, pinch of salt and cream of tartar on medium speed until soft peaks form. Gradually add the sugar, 1 tablespoon at a time, while continuing to beat on high speed. Beat until stiff, glossy peaks form. Add vanilla extract and mix until combined.
- Spread the meringue evenly over the entire dessert, ensuring it covers the ice cream and cake completely, and seals the edges. You can either spread it by hand or use a piping bag for a decorative touch.
- After assembling, use a kitchen torch to carefully brown the meringue on the outside. Move the torch evenly over the surface until the meringue is lightly golden brown.
- Once the meringue is nicely browned, use a sharp knife dipped in hot water to slice into portions. Serve immediately and enjoy the deliciousness!